

Neutral And Natural: A Simple DIY Wooden Bead Chandelier Tutorial
Even though it has been well over a year since we moved to California, I have not really gotten an opportunity to do much decorating. I absolutely love interior decorating and can not wait to have a home of my own (we are currently living with my in-laws) to let my creative juices run wild in! Well, back to the present day, I have been eyeing chandeliers to put in our bedroom because I truly feel that a single chandelier can really spruce up an otherwise ordinary room. The unfortunate thing is that all of these chandeliers are way out of my budget… but when has that ever stopped me before LOL!
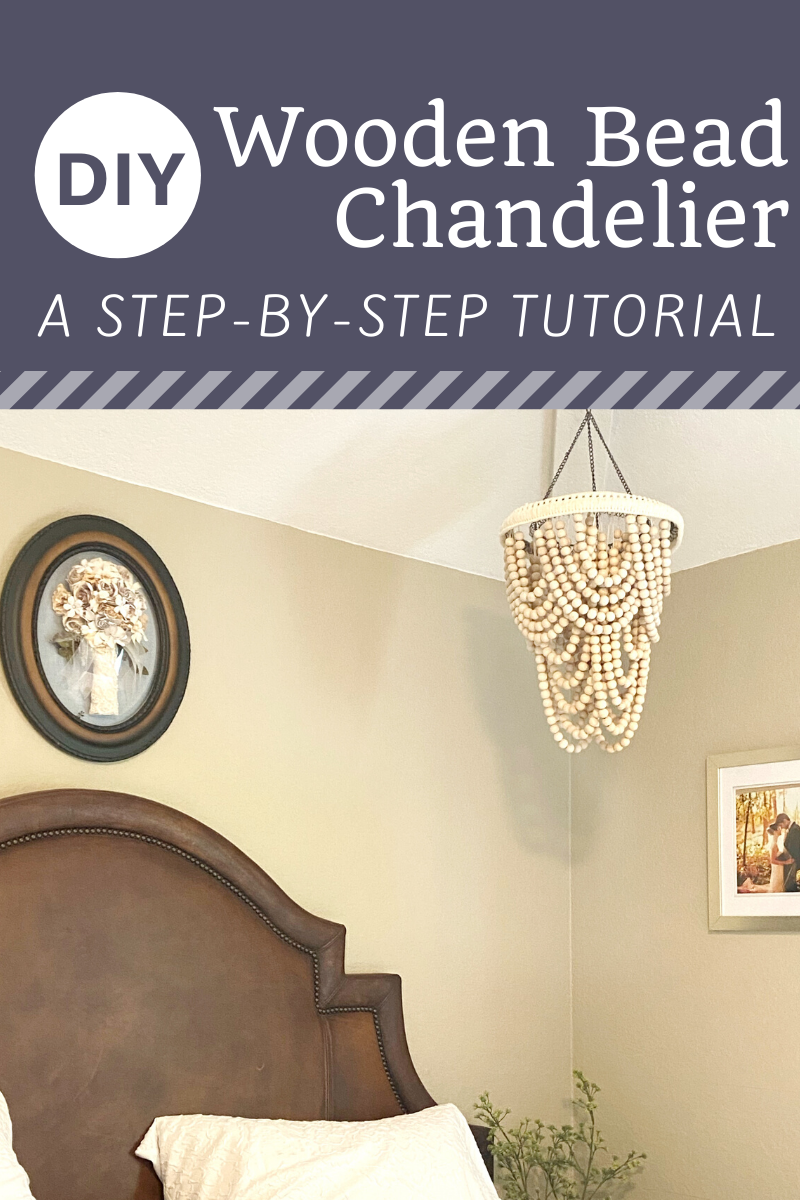
The chandelier that I had been eyeing for the longest time was a natural wooden bead farmhouse style piece. I began searching the internet for ways that I could DIY this chandelier and my first go to was my all time favorite… Amazon Prime. Depending on how large you wish for your chandelier to be, this DIY version can be done for under $115 with all supplies being available on Amazon. ** Edited To Add: The chandelier form I used is unfortunately not available any longer on either Amazon or other sources. I have included links to a few products that can get you the same look, it will just involve tweaking the tutorial a bit using your creative judgment as the alternative does not have loops/rungs like the one I used for this tutorial.
I will go through the steps here, but know that there is room for creativity and that these steps do not need to be followed precisely. You should concentrate on the overall sequence of steps as opposed to the details (number of beads, length of string, distance apart etc.) and create the look that works best for you! As sometimes words can be hard to follow, I have also included a short video at the end of this post that will hopefully be helpful although I was not great about remembering to video all the steps (note to self, do better next time LOL)!
Some links in this post are affiliate links which means I will receive a small commission if you purchase through the link provided. It is not necessary to shop through my links but if you do THANK YOU for your support of me and my blog! See Disclosure For More Details
Wooden Bead Chandelier Supplies Needed
Chandelier Form (the original one I used is sold out but you can use this wreath form and these hook chains to create the same look)
Wooden Beads (I needed a little over 1,000 beads to create the chandelier seen here, I priced these beads out from various places and Amazon has by far the best deal!)
Optional:

Step By Step Wooden Bead Chandelier Tutorial
You will want to begin by spray painting the chandelier former whatever color you desire. For me, I used a shimmery dark bronze. Let the chandelier fully dry before proceeding with the next steps.
Before we go further, let me walk you through the terminology that I will be using. The term “tier” will apply to the top and bottom levels of the chandelier. Looking at the photo, you can see that the bottom tier is longer (and therefore has more beads per strand) than the top tier. Using the type of chandelier form that I have, the lower tier will be the inside circle and the top tier will be the outside circle. The next term, “section” will then be used to describe the ‘U’ shaped components that make up each tier. Finally, the term “strand” will apply to the 4 string of beads that make up each ‘U’ section.
You will want to begin with the lower tier of the chandelier. The lower tier should have 4 sections and you will begin the first section by making a strand of 44 beads. To easily make the strand, use a an upholstery needle with a large eye and thread the twine (I use about 2-3 ft of twine for each strand just to be sure I have enough) through the needle. Then simply thread your needle through 44 beads so they all remain on the string and take the needle off.
Holding the strand by both ends to avoid losing any beads, pick it up and bring it to your chandelier form. Choose your starting point, you can start anywhere, as long as it is on the inside circle, and then tie one end of that strand around one of the rungs/loops of the form. You should double knot this, leaving a small piece of twine hanging off the end (do not worry, this will be cut later). Now, count over 25 rungs/loops and then tie the other end of the twine to the former. You want the strand to be even meaning the wooden beads on each side of your ‘U’ should be at the same height. Adjust as needed to ensure evenness. *** Keep in mind, this is one of the steps you will need to get creative on. Unless your chandelier former has loops/rungs, you will need to just eyeball how far apart to tie the ends of your string. This is totally up to you and there is no wrong way to do this, just keep in mind that you want to try and make it consistent and even throughout the whole chandelier.
At this point you should now have 1 strand secured to your former that forms a fairly wide ‘U’. This will be the start of your first section. You are now ready to create your next strand. This next strand will be a little bit shorter than the first, at 38 beads. String your beads onto the twine and remove the needle.
Carry this 38 bead strand to your chandelier former and tie the first end 1 rung away on each side from the 44 bead strand. Tie the second end of the 38 bead strand to the rung that is two in front of the 44 bead strand. Double knot both ends once you verify that they are tied evenly. At this point you should have two ‘U’ shaped strands that are placed one rung away form each other on either side, with the 38 bead strand being slightly shorter/above the 44 bead strand.
Being your next strand by stringing 32 wooden beads onto a piece of twine. Once all beads are on the twine remove the needle and carry the strand over to your crown former.
Tie one end of the 32 bead strand 1 rung away from the 38 bead strand on each side. Once you verify that the strand is even, double knot on each side. You should now have 3 ‘U’ shaped strands that are all placed 1 rung away from each other on either side. Each strand should be slightly above the other beginning to make an upside down rainbow.
For your last strand in this section, make a 26 bead strand. Once complete, tie the 26 bead strand in the same manner as the previous strands, 1 rung away on either side from the 32 bead strand. You should now have completed your first section, complete with 4 strands, forming 4 ‘U’ shapes that are each progressively shorter than the other.
To begin your next section on the lower tier, string together another strand of 44 wooden beads. When placing this on your chandelier, decide exactly where you would like your next section to start - there is no right or wrong way to do this. For my chandelier, I started the next section by tying the first end of the 44 bead strand just to the outside of the midpoint of the first tier. However you decide to start your next layer, just be sure that you are staggering each section enough so that each section appears separate from the next.
After deciding on the placement and tying the first end of your 44 strand in front of the strands of the previous section so that your second section overlaps the first slightly. Tie the other end 25 rungs away from the first, just as you did in the first section.
Complete the second section by stringing and then tying the 38 bead strand, the 32 bead strand, and the 26 bead strand - in the same way that you did in the first section, each strand separated by each other by one rung on each side.
Begin your third section just the way you did with your second section. Complete your third section just as you did the other two - creating four strands (of 44, 38, 32, and 26 beads each), all separated from each other by one rung on each side. By this point you lower tier should be looking quite full and almost complete!
Depending on how you positioned your sections and the overall diameter of your chandelier former, your fourth and final section may differ a bit with the number of rungs in between the ends of the 44 bead strand, likely being less than 25 as used in the other sections. Having this sections be slightly narrower than the others will not be noticeable in the end, although try to continue the structure of separating the strands by one rung on each side. If your chandelier form is smaller than the one shown here, it is possible that you may only have enough room for 3, instead of 4 sections.
Once you have completed all four sections of your lower tier and are satisfied with the appearance, ensure that all ties are double knotted and then cut off any excess string, leaving about one inch of string remaining at the ends. Once all excess string has been cut, you will now use a hot glue gun to glue down the ends of the string on top of the knot and exposed frame. Once each strand is hot glued, you should not see any excess string sticking out, all should be flush and smooth.
You are now ready to begin your upper tier which will have 5 sections (or possibly 4, depending on the size of you chandelier former). At this point, you will want to begin by making your first strand for your first section, this first strand will have 38 beads. You will want to play around with the placement of your first section to see what look you like best, once you have decided, tie down the first end of your 38 bead strand and your second end 24 rungs away from the first. Double knot the ends once they are in an even position.
Complete your first section by placing three more strands, a 24 bead strand, a 20 bead strand, and a 16 bead strand. Skip one rung in between the 38 bead and 24 bead strand, and one rung in between the 24 bead and 20 bead strand. Skip two rungs in between the 20 bead and 16 bead strand.
Finish the upper tier by creating 4 more similar sections, playing around with the start of each to see which look you like best. Keep in mind that your 5th and final section of the upper tier may require a different number of rungs in between the end of your longest (38 bead) strand.
Just as you did with the lower tier, cut off the excess string/twine of each strand and then hot glue the ends down smooth.
An optional last step that can bring the look of your chandelier together is to measure out a nice ribbon trim such as this one or this one, along the rim of the upper level/tier. Cut the trim after measuring and then hot glue to the outer rim of the upper tier. Alternately, you can leave the trim off to give the chandelier a more industrial look.
Overall this whole project probably took me somewhere between 10-12 hours to complete although this was over the process of several months as it was around the holidays and things were crazy! I was so happy though with how it turned out I now have the itch for making a larger version for my girls room but that will be a different DIY for another day LOL! If you find this tutorial helpful, have questions, or want to share how yours turned out - please leave a comment below!
PS - I love doing DIY crafts but rarely post them on the blog here… I will try to be better about that because these are always some of my most popular posts! If you want to check out another DIY project of mine, here is the tutorial for a flamingo tissue pom garland!

